.

.

Tuesday, October 21, 2014

Why, Hello There!

I saw this adorable "Hello" door mat on pinterest, and I just had to make it! It is so simple and yet so cute and welcoming!

I first got a new doormat from Home Depot. It was about $10. 

By following the tutorial HERE I was able to create my very own door mat.


I free handed the "hello". I am not the greatest artist...but I think I did pretty well! I did it very lightly at first just in case I made a mistake.

This is how it turned out!


Thursday, June 5, 2014

virgin hair no more.

Hey! Christi here! So I did something a little crazy for me...I dyed my hair! I have gotten highlights here and there in the pastbut I have never dyed my whole head of hair. Basically this is what happened...


Getting my hair colored on Friday... thinking this for the base color with deeper red/auburn highlights. Thoughts?
photo credit {here}

P.S. Don't you just love Emma Stone! I adore her. 


I still like my natural hair color, but this will be fun for the summer. I know this was just a small change, but it really got me thinking. Isn't is crazy how only changing one small little thing about yourself can make a huge difference. Whether you change how you did you make-up that day, or you decided to wake up 30 minutes earlier than usual, it can make you feel so different! Change is good. It is as simple as that. Honestly, I don't think anything bad can come out of change. Anyways, just a few thoughts I've been having. I hope this post inspires you to change something in your life! It can be your hair color, your lipstick, or even how you greet someone today.


Wednesday, June 4, 2014

bridal shower inspiration.

Wedding season is in full swing! I am sure you all know at least one young bride with their wedding just around the corner. Last summer I was able to plan two bridal showers for two lovely ladies. I just thought I would share a few ideas for the next time you need to plan a bridal shower. 
 
 
First I will show you Paige's Bridal shower. With our cheap college budget we did our best to throw together a classy bridal shower for her. Instead of coming up with a theme, we just decided to stick with her wedding colors. 


In this picture above is a really simple banner that I made. All I did was print out letters on purple paper and tape them to a string. This only took me about 5 minutes to do and it was more than worth it for a perfect little touch to the bridal shower. 


Then we made tons of cake pops! You can NEVER go wrong with cake pops. The little pearl sprinkles I bought were definitely a hit at the party.


This is what the table setting ended up looking like. We put one of those cheap plastic table clothes under a nice lace one for a pop of color. We also strung Christmas lights on the ceiling and under the table clothe. Then there are the balloons. I feel like balloons are a difficult thing to decorate with for a "grown-up" party. But this layout made them look classy and it gave some height to our table.


Next, we have Natalie's Bridal shower. This is one of my favorites! We decided to do a tropical theme to go along with her honeymoon.
 

See that cute, fun tassel garland...I made that! I just used this tutorial here.
I also made the cake stands by getting cheap candle sticks and plates then spray painting and gluing them together. It was difficult to find the right kind of glue...and eventually they all fell apart. But they looked good for the picture!


My friend made the most amazing smoothies! And then we topped them off with cute paper straws and little umbrellas. A drink isn't tropical with out a little umbrella! We all know that.


We also threw some yellow pom poms above the treat table.


To give the girls a chance to do something personal for Natalie, we printed off pictures of her with her friends and had everyone sign the pictures with their favorite memory. It was a cute gift to give to the bride-to-be after the shower.


We set up this canopy so we could have a place to relax and visit. The little kiddy pool was so fun! 


Can't forget the Kabobs! We let the girls make their own Kabobs, and then we threw them on the grill.


Oh and lastly, here are the invitations that I made for the party.


I hope that some of these ideas will help inspire you with your planning this wedding season! If you want any more information just let me know! 


Thursday, May 29, 2014

sewing a cushion.

A while back I got this cute little make-up chair from the thrift store for $6. I just couldn't pass it up! The cushion was pretty dirty and it had a hole in the middle where there used to be a button. You can not really tell from the picture, but it needed some love. 


I started out by tracing around the cushion onto a piece of freezer paper. I chose freezer paper just because I have a lot of it and it was wide enough for my cussion. After tracing the circle I added 1/4" all the way around for a seam allowance.


-Tip Time- A little trick that I use to draw a seam allowance is a compass. You can set it to what ever measurement you need and that way you get a nice even line all the way around. It saves so much time compared to using a ruler! 

As you can see below, I then cut out a front and back circle as well as a strip to go around the sides. I used a measuring tape to measure around my cushion and then added 1/4" seam allowance to both ends. 


To continue I sewed the strip of fabric together to make it into a ring.


And then with my fabric wrong sides facing together, I sewed the strip to one of the circle pieces. 


... and then the other. Making sure to leave an opening to addd the stuffing. 

I then ripped open my old cushion to reveal what was inside as stuffing. 


Inside was a pulverized foam fiber fill that was honestly a mess, but it was not dirty and so I decided to go ahead and reuse it so I did not have to buy new filler. 


-Tip- if you are going to be making a round cushion it is a good idea to notch the seam before you flip it right side out. I totally forgot to do this. Woops! This resulted in the edges of my cushion being a little wavy instead of crisp.


Then I pinned my hole closed, folding under the 1/4" seam allowance. I used a ladder stitch to close my hole. If you don't know how to do a ladder stitch here is a good tutorial on how to do it. 


Here it is all done and being cute at the farmers market. It goes perfectly in my portable changing room. 

Wednesday, May 28, 2014

DIY painting and glazing a dresser.


I LOVE long weekends...and this is why! I get to work on big projects like this one.


First you get your dresser! I try to always work with real wood. It is so much easier to work with than laminate or something like that. 
 
 
Next, we painted! We got our paint from Walmart. The paint we used was a paint and primer in one. I thought this wouldn't work as well as paint and primer being separate. But after about two coats it looked great! 
 
 
Once the paint was completely dry (over night). I could start glazing and antiquing the dresser. 

 With glazing, I take 4 parts glaze and 1 part regular acrylic paint (I went with black this time) and mix them together. I then paint the glaze on very thin, making sure to get into all the nooks and crannies. I let it dry and little and then wipe off the glaze I don't want to stay on there with a damp rag. Once all my glazing was finished I sprayed down the whole dresser with a clear spray for protecting the paint. This is suppose to help your dresser to not chip.


In this picture, everything is glazed. We need to just spray paint the hardware and stain the top. 


And its done! I love how the wood top turned out. It might be my favorite part of the whole dresser.


If you have any questions about what I used or how I used it, don't hesitate to ask! 


Monday, May 26, 2014

how this redhead tans.


Hey ya'll! I hope you are having a great Memorial weekend. With summer right around the corner, the shorts are getting shorter and we're breaking out our swimsuits. For a redhead like me...this can be a problem. I am the kind of person that goes from white to red and back to white. I do not tan! Because I can't tan, I turn towards self tanners. It has taken my a good 3 years to find the perfect combination to make my tan look natural and healthy. 


This amazing tutorial done by Maskcara has really helped me! She shows you exactly how to apply self tanner. Here is a run down for what I do:


Step 1: Shower and exfoliate. I just use a lufa and really scrub.

Step 2: Put regular lotion where ever you do not want the tanner to really soak in (knees, elbows, ankles).

Step 3: Rub in your self tanner. This is where Maskcara's tutorial really helped me out.

Step 4: Let dry. I finished getting ready and let all the tanner soak in before I put my clothes on.

THE PRODUCTS:


Jergens Natural Glow Foam (Medium)
I use this about 2 times a week. This works much faster and comes out much darker than the jergens tanning lotion.

SUN LABORATORIES Self Tanning Lotion Tan Overnight - Medium (8 oz) 

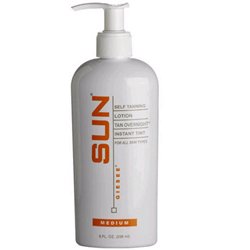
Sun Laboratories Self Tanning (Medium)
I use this 1-2 times a week. This stuff comes out dark!! Don't let that scare you. This is where most of your tan will come from. This is by far the best self tanner I have ever used. The color is perfect on me! Not too orange...not too yellow. It looks really natural on my white, freckled, redheaded skin.

 
Jergens Natural Glow (Fair)
 I use this on the days that I am not using one of the other two products. We all know that self tanning tans do not last! This lotions is perfect for maintaining the tan and keeping everything looking natural.


I hope this helps all you fair skinned friends out there!  

Saturday, May 24, 2014

casual friday: Maternity Edition.


Skirt: made by me.
Shirt: thrifted (PINK Brand).
Belt: thrifted.
Shoes: Roxy.
 Headband: MaymeRae Boutique (Similar)
Teal & Grey Scarf: MaymeRae Boutique
Black & White Scarf: MaymeRae Boutique 


I have to say that finding cute maternity clothing is a challenge. A few days ago I went to my closet to get dressed and I realized that barely any of my clothes fit me. So I pretty much wear yoga pants, the one pair of maternity jeans I have, and the few maxi skirts I made a while back. I also headed to the thrift store to find some shirts that would fit my new body. They are not maternity shirts, but they are a larger size than I normally wear so they have some wiggle room. I have to say I just love buying clothing second hand! It may take a little more time and energy to find what you are looking for, but you can find great deals! I snatched up this like new shirt for only $1.

 I hope this inspires you to go out and find some thrifted things, and to be creative about dressing your prego body.